How to Give a Developer Access to Your Website for an Audit & Optimization (Without Risking Your Live Website)
So a developer told you your website could be faster, rank better, and convert more — and then asked for "access to your source code."
If that request made you nervous, good. You should think carefully before handing over the code your business runs on. But here is the reassuring part: modern Git platforms are built for exactly this situation. You can grant a developer scoped, revocable access to a single repository — without sharing a single password — and the entire audit can happen without your live website ever being touched.
In this guide, I'll walk you through:
- Why I need source-code access for a proper website audit
- How to grant private repository access on GitHub, GitLab, Bitbucket, self-hosted Git servers, custom SSH servers, VPN-locked networks, and projects with no Git at all
- What actually happens after access is granted, step by step
- Why your production website stays safe throughout
- What realistically gets optimized, and how improvements are verified
- What you need to provide — and what I handle (spoiler: your part is small)
No prior Git experience needed. Every instruction in this guide is labeled, so you always know whose job it is: You means a click or two in your browser, and I means work that happens on my machine. Every platform instruction reflects the real permission models — because they are not identical across providers.
Why Do I Need Source Code Access?
What can be audited from the outside
Plenty can be learned from your public URL alone. I can run tools like PageSpeed Insights or Lighthouse against your live site and measure:
- How fast pages load (Core Web Vitals field data from real visitors)
- SEO surface issues — missing meta tags, broken structured data, crawlability problems
- Accessibility signals — missing alt text, contrast problems, heading order
- JavaScript weight and render-blocking resources, as observed from the browser
A browser-based audit tells you what is underperforming. It's a great triage step, and for a first-pass review it can be done with zero access at all.
What only the source code can reveal
What a browser audit usually can't tell you is why something is slow or broken. The causes live in the codebase:
- A 4 MB hero image committed to the repository years ago
- An analytics snippet loading synchronously and blocking rendering
- A single dependency quietly pulling in hundreds of kilobytes of unused code
- A database query running inside a loop on every page view
- Build and deployment configuration that ships unoptimized output
- Outdated packages with known security vulnerabilities
A doctor can assess a house from the street, but a renovation quote requires the blueprints. Source access lets me diagnose root causes instead of guessing at them from the outside — and, crucially, lets me implement fixes that fit your codebase rather than bolting on generic plugin-style workarounds.
Why implementation requires access
An audit produces findings. Optimization produces changes to code. To make those changes safely, I need to:
- See how your site is actually built (framework, templates, dependencies)
- Verify a fix fits without breaking something else
- Test the change in an isolated environment before you ever see it
None of that requires touching your live website — which is exactly what the rest of this guide shows.
How to Grant Private Repository Access (Without Sharing Your Password)
Here's how it works on each platform.
1. GitHub private repository
GitHub calls per-repo access "collaborators." On the free plan you can add unlimited collaborators to private repositories, so this costs nothing.
Your part — the clicks you make (official documentation):
- Ask me for my GitHub username.
- Open your repository on GitHub and click the Settings tab.
- In the "Access" section of the sidebar, click Collaborators.
- Click Add people, type my username, and select me from the results.
- When inviting, choose the permission level to grant (see GitHub's permission levels): Read for the audit — view and clone only — or Write once you approve actual changes.
- Confirm. I receive an email invitation and accept it, which is when access activates.
If your repository belongs to an organization, access is managed by an org owner through teams or outside-collaborator invitations — the same least-privilege logic applies.
My part — once invited, I clone the repository to my machine:
git clone https://github.com/your-username/your-website.git

# or via SSH:
git clone git@github.com:your-username/your-website.git
Revoking access later: same Settings → Collaborators screen, one click (docs).
2. GitLab private repository
GitLab organizes access as project members with roles. The roles matter, because GitLab's model differs from GitHub's (official roles documentation):
| Role | What it allows |
|---|---|
| Guest | Project features like issues — cannot pull source code in a private project |
| Reporter | Read-only repository access: view and clone the code |
| Developer | Push branches and open merge requests; cannot push directly to a protected default branch |
| Maintainer | Manage the project, including repository settings |
| Owner | Full control, including deleting the project |
Your part — the clicks you make (official documentation):
- Open your project on GitLab.
- In the left sidebar, go to Manage → Members (older GitLab versions place this under Settings).
- Click Invite members, enter my email or username.
- Choose a role: Reporter for a read-only audit, or Developer for implementing changes on a separate branch.
- I accept the email invitation.
Protected branches: on GitLab, the default branch (usually main) is protected by default. Check Settings → Repository → Protected branches to confirm who may push and merge — by default, Developers must go through merge requests rather than pushing straight to main.
My part — I run this on my machine:
git clone https://gitlab.com/your-username/your-website.git

# or via SSH:
git clone git@gitlab.com:your-username/your-website.git
My part: GitLab's HTTPS authentication uses a personal access token or a browser-based credential helper — your account password never comes into it.
3. Bitbucket private repository
Bitbucket grants access through its User and group access screen with three repository permission levels: Read, Write, and Admin (official documentation).
Your part — the clicks you make:
- Open the repository on Bitbucket.
- Select More actions (…) → Settings (or Repository settings), then User and group access.
- Click Add members and enter my Bitbucket username or email.
- Choose the permission: Read for the audit, or Write for the implementation phase.
- I accept the invitation. (The free plan includes a small team — up to five users at the time of writing.)
For extra safety, pair this with branch permissions so no one can push directly to your main branch.
My part — I run this on my machine:
git clone https://your-username@bitbucket.org/your-workspace/your-website.gitMy part: Bitbucket doesn't accept your Atlassian account password for Git operations over HTTPS. I authenticate with an app password or an API token instead — credentials I scope and revoke independently of your login, and that you never have to handle (API tokens are the long-term replacement for app passwords).
4. Self-hosted GitLab, Gitea, and Forgejo
Many companies run their own Git server at a private domain (for example, git.yourcompany.com) using self-hosted GitLab, Gitea, or Forgejo. The good news: the workflow is nearly identical to the cloud versions — with your own domain in the URLs.
Your part — a prerequisite: I need a user account on your instance first. An administrator creates it (or I register myself, if you allow it).
- Self-hosted GitLab: you invite me as a project member exactly as in the GitLab section above (Manage → Members, Reporter or Developer role). I add my SSH keys under my profile's SSH keys settings.
- Gitea / Forgejo: you open the repository → Settings → Collaboration, add my username, and choose my permission: Read, Write, or Admin (Gitea permissions, Forgejo repository permissions). Read is enough for an audit.
My part — SSH: I generate a key pair, add the public key under my account settings (SSH / GPG Keys in Gitea/Forgejo), and from then on connect without passwords.
My part — HTTPS tokens: I create a personal access token in my own account settings (in Gitea: Settings → Applications; in GitLab: personal access tokens), and use it as the HTTPS password.
My part — I clone from your custom domain on my machine:
# SSH (standard port):
git clone git@git.yourcompany.com:your-team/your-website.git

# SSH on a non-standard port:
git clone ssh://git@git.yourcompany.com:2222/your-team/your-website.git

# HTTPS with a personal access token:
git clone https://git.yourcompany.com/your-team/your-website.git
All three platforms also support branch protection — worth enabling on the default branch before any outside work begins (Forgejo branch and tag protection).
5. Custom SSH Git servers (no web interface)
Some repositories are just bare folders on a server, accessible only over SSH. No web UI, no invitation buttons — access is managed with SSH keys.
My part — on my machine, I generate a key pair:
ssh-keygen -t ed25519 -C "audit@example.com" -f ~/.ssh/id_ed25519
cat ~/.ssh/id_ed25519.pub
I share only the .pub public key — a single line of text that is safe to send by email. The private key (id_ed25519, without .pub) never leaves my machine.
Your part — on your server, you authorize the key:
Append the public key line to the Git user's authorized_keys file:
echo "ssh-ed25519 AAAAC3Nza... audit@example.com" >> /home/git/.ssh/authorized_keysOptional hardening: set the Git user's login shell to git-shell so the account can only perform Git operations, not open a general shell.
My part — I run this on my machine:
git clone git@git.yourcompany.com:/srv/git/website.gitThe first connection prompts to trust the server's fingerprint — expected behavior.
Revocation is surgical: delete that one line from authorized_keys, and the key stops working. This is precisely why keys are safer than passwords — and why you should never share server passwords with me.
6. Repositories behind a VPN or private network
If your repository lives on an internal network, I cannot reach it by default — and that's your firewall doing its job. The URL simply doesn't exist on the public internet, so no amount of Git skill gets me in.
Your part — you have three safe options:
- A temporary, scoped VPN account. Effective, but understand what it grants: network-level access to everything the account can reach, not just Git. Scope it tightly (least-privilege groups, only the Git host reachable), enable logging, and disable the account when the engagement ends.
- A client-side audit runner. The audit tools run on a machine inside your network, and only the resulting reports are shared externally. Nothing leaves your perimeter but findings.
- A Git bundle export — the most underrated option. Git can package an entire repository (all branches and history) into a single file, no network required (Pro Git: Bundling):
# Inside your network, on a machine with the repository:
git bundle create website.bundle --all

# Transfer the file securely, then I run:
git clone website.bundle website
My part: I get a full local clone from the bundle file. Changes come back as patches (shown below). This avoids opening your network and avoids creating any account at all.
Whatever you do, don't expose a private Git server to the public internet just for an audit.
7. Projects without Git hosting (ZIP files)
Some websites still live as files on a hosting account with no repository at all. You can still get a meaningful audit — with some limitations.
Your part — what to do:
- Package the source code (the site's files, not just the public HTML — ideally the templates, assets, and any build files that exist).
- Transfer it via an expiring, access-controlled link (cloud drive with link restrictions), not as an email attachment. If you must password-protect the archive, use a tool with strong AES encryption (such as 7-Zip's AES-256 mode) — standard ZIP password protection is weak.
My part — I immediately create a local Git baseline, which restores the review benefits of a proper workflow:
git init
git add -A
git commit -m "Baseline from client ZIP"
Now I can produce real diffs and deliver fixes as reviewable patches, instead of "here are the changed files, trust me."
Limitations compared with Git-based workflows:
- No history — can't see when or why code changed
- No pull-request review interface — patches are reviewed manually
- Version drift — if your live site changes mid-engagement, the ZIP no longer matches reality
- Rollback depends on your hosting backups rather than a one-click Git revert
If you don't use Git yet, an audit engagement is actually a great moment to start.
What I Do After You Grant Access (Step by Step)
Every step below is mine, and every one happens on my machine — you don't follow along, install anything, or run a single command. It's here so you can see exactly what happens after you click Add people.
Step 1: I verify access
git ls-remote https://github.com/your-username/your-website.gitThis lists the repository's branches without downloading anything — a quick confirmation that credentials work before anything else.
Step 2: I clone into an isolated workspace
git clone https://github.com/your-username/your-website.gitCloning downloads a complete local copy of the repository to my machine. Nothing upstream changes. Your repository, your hosting, and your live site are all exactly as they were — I now simply have the blueprints to work from.
Step 3: I identify the framework and package manager
I read the project's manifest files — package.json for Node/JavaScript projects, or equivalents like composer.json (PHP), Gemfile (Ruby), or requirements.txt (Python). Lock files reveal the exact package manager: package-lock.json means npm, pnpm-lock.yaml means pnpm, yarn.lock means yarn. This determines how the site builds and how dependencies can be audited and updated.
Step 4: I inspect the codebase and project structure
Routes, templates, components, configuration, build scripts, the deploy setup — a structured read-through that builds the mental map every later step depends on.
Step 5: I run static analysis and security checks
With the code available, automated checks can finally run:
npm audit          # dependency vulnerability report (npm; pnpm/yarn/composer have equivalents)
npm run lint       # code-quality checks, if configured
This is also where security-minded reviews happen: known-vulnerable dependencies, secrets accidentally committed to the repository, unsafe patterns worth flagging — the kind of issues aligned with OWASP guidance.
Step 6: I run Lighthouse and real-browser audits
The live site gets measured too, from the outside:
- PageSpeed Insights — real-user Core Web Vitals data plus a lab analysis
- Lighthouse from the command line, for repeatable, saved reports (command below)
npx lighthouse https://www.your-website.com --output=html --output-path=./audit-report.htmlAnd, critically, the local production build — so before/after comparisons never use your live site as a test bed:
npm run build
npm start
(Non-Node projects use their own build and preview commands — the README or manifest files from Step 3 point the way.)
Step 7: I identify performance, SEO, accessibility, and code-quality issues
The findings from the outside-in tests and the inside-out analysis now combine into one picture: what is slow, why it is slow, what's broken for search engines and screen readers, and what technical debt is amplifying all of it.
Step 8: I prepare optimization recommendations
A good audit ends in a prioritized report: each finding with its evidence, why it matters, the proposed fix, and the effort involved — ranked by impact. No invented numbers, no guarantees before measurement.
Step 9: I implement approved changes on a separate branch
This is where the safety model kicks in. I never edit the main branch directly:
git switch -c optimize/core-web-vitals # create and switch to a new branchEvery change now lives on a branch — an isolated line of development that coexists with your untouched main code.
Step 10: I run tests and compare before/after results
I re-run the same audits against the same local production build — before and after the changes, multiple runs each, same environment, same pages, same tool. The comparison is honest only when everything except the change is held constant. Automated tests, if the project has them, run too.
Step 11: I deliver changes through a Pull Request / Merge Request (or a patch)
git push -u origin optimize/core-web-vitalsThen I open a Pull Request (GitHub/Bitbucket) or Merge Request (GitLab): a page where you can see every changed line, comment on anything, and approve or reject — before anything merges.
If the engagement was read-only (no write access), the same changes travel as patch files:
# Me: generate patches
git format-patch origin/main -o ./patches

# You: review, then apply
git am ./patches/*.patch
The Most Important Part: Your Production Website Is Safe
If you remember one section from this article, make it this one.
How the safety model works
- The original production branch remains untouched. My work never lands on
mainunless you merge it there. - I work on an isolated local copy. A clone is a download to my machine. It changes nothing.
- All changes happen on a separate branch. A branch is a parallel timeline — your main line of code doesn't even know it exists.
- The original code remains available for comparison. Every change is a visible diff against the code you have today. Nothing silently mutates.
- Changes are tested before delivery. Builds, audits, and tests run against my isolated copy, not your live site.
- You review and approve before anything merges. The Pull Request / Merge Request is where you see every line and make the call.
- Nothing reaches production unless you merge and deploy it. The merge button and the deploy pipeline are yours.
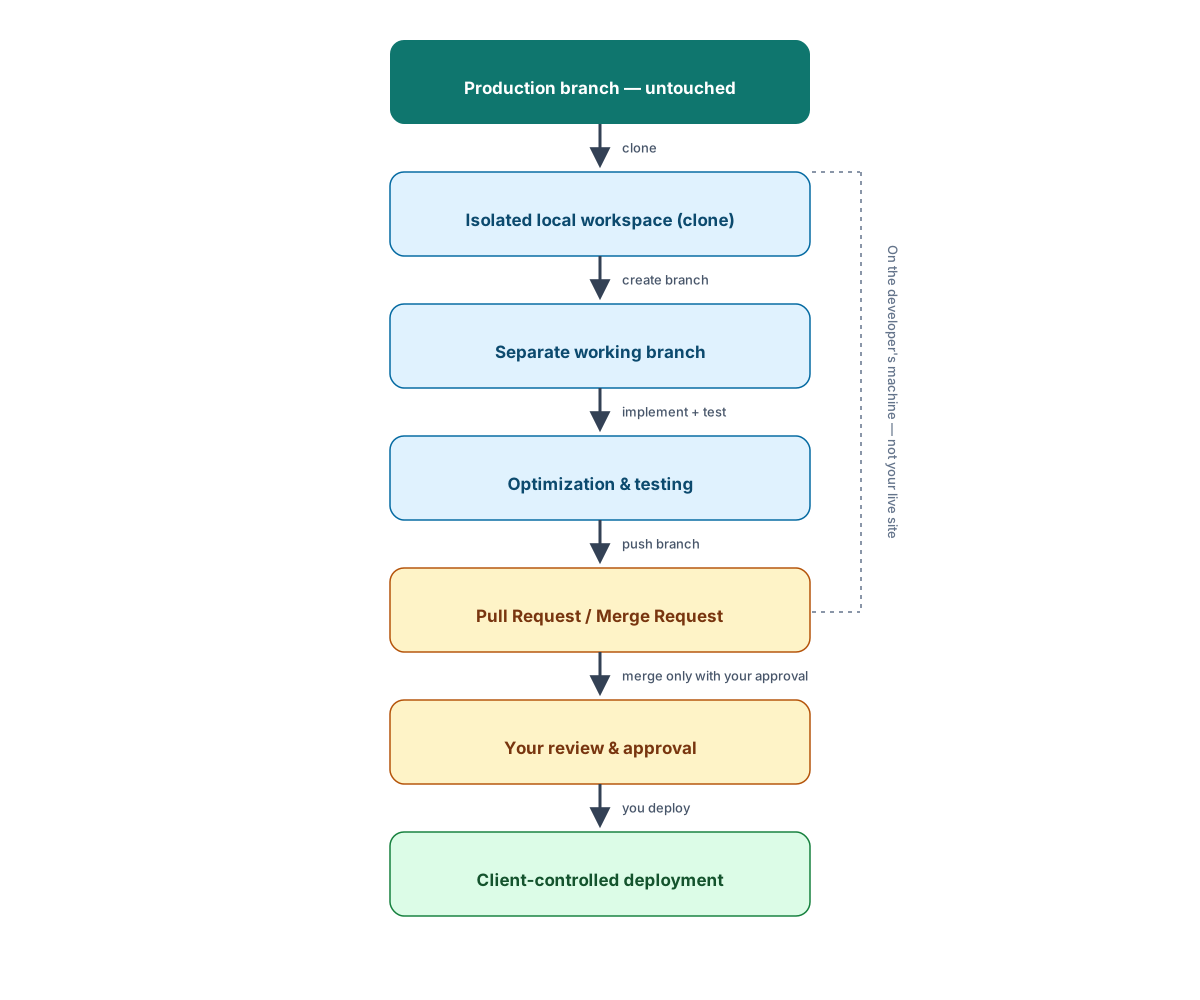
The workflow, visualized
An honest caveat: cloning alone doesn't make anything "safe"
Here's the part oversimplified tutorials skip. A Git clone being "just a copy" is true — but production safety is the sum of several controls, not the clone itself:
- The permission you granted. Read access is inherently safer than Write. Grant Read for the audit; upgrade to Write only when implementation begins.
- Branch protection. Protected branches on GitHub, GitLab, and Bitbucket block direct pushes and force-pushes to your main branch, and can require review before merging. Enable this before onboarding anyone.
- Your deployment configuration. Know exactly what triggers a deployment. If your host auto-deploys on any push, fix that first — deploys should trigger only from merges to a protected branch, or from your explicit action.
- Production credentials you never share. Hosting control panels, server SSH passwords, deploy keys, CI/CD secrets, database passwords — a code audit needs none of them. Every credential you hand over is a control you've given up.
- Revocation. Remove my access when the engagement ends. And keep in mind: any copy made while access was active (a local clone, a fork) still exists afterward — access control is also a trust decision, which is why scoping it tightly matters.
Get those five right, and the workflow above isn't just a diagram — it's how the engagement actually runs.
Before and After: What Actually Gets Optimized?
What a website optimization engagement delivers depends on what the audit finds. The honest version: no developer can promise specific numbers before measuring. But these are the areas where source-code access typically uncovers real wins.
Images and modern formats
The single most common finding. Source access reveals the original assets: oversized hero images, uncompressed exports, images served as PNG when they could be modern formats like WebP and AVIF, missing responsive variants for phones. Fixes include generating optimized derivatives, serving appropriately sized images per device, lazy-loading below-the-fold media, and correct width/height attributes to prevent layout shifts.
JavaScript weight
Bundle analysis often shows that visitors download more JavaScript than the page actually uses. Typical fixes: code-splitting so pages load only what they render, deferring third-party scripts, removing polyfills for browsers you no longer support, and eliminating scripts whose only job is to render what plain HTML could.
Unused dependencies
Old plugins and half-removed libraries linger in package manifests, inflating builds and attack surface. Dependency audits identify what's unused (tools like depcheck for Node projects), what's duplicated, and what's outdated with known vulnerabilities — then remove or update it, carefully.
Core Web Vitals
Google's Core Web Vitals are the three user-experience metrics that matter most:
| Metric | Measures | "Good" threshold (75th percentile of real users) |
|---|---|---|
| LCP — Largest Contentful Paint | Loading: how fast the main content appears | ≤ 2.5 seconds |
| INP — Interaction to Next Paint | Responsiveness: how fast the page reacts to clicks and taps | ≤ 200 milliseconds |
| CLS — Cumulative Layout Shift | Visual stability: how much content jumps around while loading | ≤ 0.1 |
(INP replaced the older FID metric in March 2024.) Alongside them, TTFB — time to first byte — isn't one of the three, but it's a fundamental input: no fast Largest Contentful Paint ever came from a slow server response.
SEO metadata and structured data
Source access reveals missing or duplicated title tags, absent canonical links, thin meta descriptions, missing sitemap or robots configuration, and absent structured data — the machine-readable context that helps search engines understand your pages.
Accessibility
Audit tools flag the surface symptoms; the code shows the causes: missing alt text, insufficient color contrast, form inputs without labels, non-semantic markup, and keyboard traps — measured against WCAG guidelines. Since accessibility overlaps heavily with semantic HTML and loading order, these fixes often improve SEO and performance too.
Rendering and loading strategy
How and when the page is built — on the server, at build time, or in the visitor's browser — shapes everything above. Source access lets a developer tune caching headers, preloading, prefetching, and rendering strategy per page type rather than applying generic rules.
API and database performance
Where the code talks to backends, source access can reveal queries in loops, missing caching, oversized API payloads, and N+1 patterns. These issues are invisible from a browser audit — you only see "the page is slow" — and they're often the difference between a fast-looking site and a fast one.
How improvements are verified (the honest way)
Repeatable, comparable measurements — not before/after screenshots of different tools on different days:
- Same environment: local production build, before and after, identical conditions
- Same tool, same pages, multiple runs, reporting the median
- Field data for the live site tracked over time after deployment — PageSpeed Insights reports real-user data over rolling 28-day windows, so real-world gains show up there as they accumulate
A professional report shows you the method along with the numbers, so you can verify every claim.
What You Need to Provide (Less Than You Think)
Here is the complete split:
| Stage | You | I |
|---|---|---|
| Source code inspection | Invite me with Read access | I clone and read the code |
| Performance audit | Nothing beyond the public website | I run Lighthouse and PageSpeed Insights |
| Code optimization | Approve the findings you want fixed | I work on a separate branch and test locally |
| Pull/Merge Request | Review the diff, then approve or reject | I open the request with every changed line |
| Production deployment | Merge and deploy when you decide | Never. Not required for an audit or optimization |
Least-privilege principles worth insisting on:
- Start read-only. Grant Write only if and when you approve implementation work.
- Scope to one repository. Never account-level access when repository-level exists.
- Prefer tokens and invitations over passwords — both are scoped, auditable, and revocable.
- Time-box everything. Where the platform supports expiry dates on tokens, use them.
- Revoke when done. Access that outlives the engagement is risk without benefit.
Frequently Asked Questions
Does the developer need your GitHub password?
No — never. You invite me as a collaborator, which grants scoped access to that one repository. Passwords hand over your entire account, and every platform prohibits them for Git operations anyway.
Can the developer access a private GitHub repository?
Yes, once you invite me and I accept the email invitation. With the Read permission level I can view and clone it — nothing more.
What if your project is hosted on GitLab or Bitbucket?
Same principle, different role names. GitLab: invite me with the Reporter (read-only) or Developer (branch work) role. Bitbucket: add me with Read or Write permission. The audit process is identical.
Can the developer access self-hosted repositories?
Yes, if the server is reachable. That means an account and invitation on the self-hosted GitLab/Gitea/Forgejo instance, an SSH key authorized on a custom Git server — or, for internal-network servers, a scoped VPN account or a Git bundle export instead of direct access.
Will your live website go down during optimization?
No. The audit and all implementation happen on my isolated copy. Your live site only changes when you merge approved changes and deploy them — typically a standard deployment, handled during a window you choose.
Can the developer accidentally overwrite your production code?
Direct pushes to your main branch can be blocked entirely with branch protection, and my changes arrive as reviewable Pull Requests. Combine that with Read-only access during the audit phase and deployment triggers you control, and "accidental overwrite" has no path to production.
Do you need to provide hosting or server access?
Not for a code audit and optimization. Server access becomes relevant only for server-level diagnostics (logs, caching configuration) — and if that comes up, scope it as its own, separate decision.
Can you review the changes before they go live?
That's the whole point of the workflow. The Pull Request / Merge Request shows every changed line, and nothing merges or deploys without your approval.
What if you don't use Git?
You send a ZIP of the source via an expiring, access-controlled link. I can still produce reviewable patches, though you lose Git's history, review interface, and one-click rollback. It works — a repository is just better.
Can you revoke repository access afterward?
Yes, instantly, from the same screen that granted it. One note: copies made during the engagement (local clones, forks) may still exist afterward — one more reason to grant the narrowest access that gets the job done, and to work with people you trust.
References
All links verified at the time of writing.
Git & tooling
- Git documentation
- Pro Git, Git Tools — Bundling
- Lighthouse documentation
- PageSpeed Insights
- Core Web Vitals
- Interaction to Next Paint (INP)
- OWASP
- WCAG overview
- MDN, image file types and formats
- Google Search Central, intro to structured data
GitHub
- Inviting collaborators to a personal repository
- Permission levels for a personal account repository
- About protected branches
- Removing a collaborator
- Managing personal access tokens
- Connecting to GitHub with SSH
GitLab
Bitbucket Cloud
- Grant access (User and group access)
- Branch permissions
- Logging in and connecting (app passwords, tokens)
- API tokens
Gitea & Forgejo
- Gitea permissions (collaborators: Read / Write / Admin)
- Forgejo repository permissions
- Forgejo user guide (collaboration)
- Forgejo branch and tag protection
Not Sure What's Slowing Down Your Website?
You don't even need to grant access to find out. A professional website audit starts with the public site — performance, SEO, accessibility, and the path to your main action — and tells you what's holding back its speed and user experience.
From there, you decide what source-code access to grant, if any. You review every proposed change, approve what makes sense, and keep complete control over what gets merged and deployed. Your production website never leaves your hands.